Easter 2016 – Part 2 – The Kids!

IMG_5874.jpg

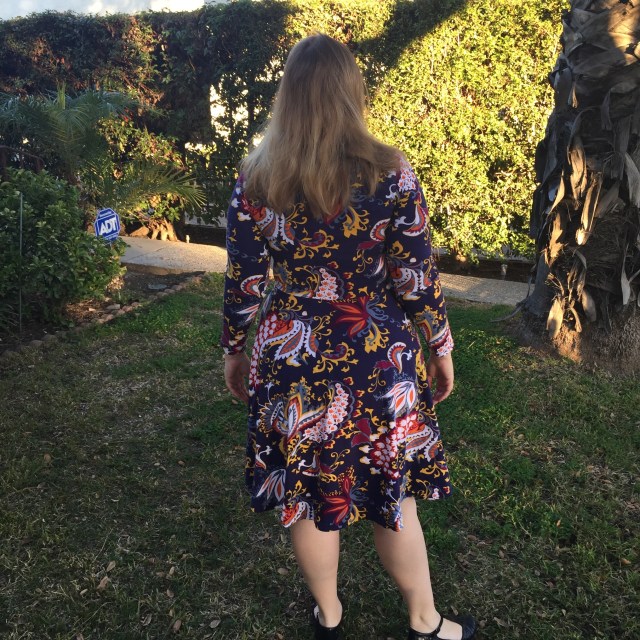
Nothing says Easter like the blur of children as they run around excited by the thought of the Easter Bunny and candy and eggs and toys!

And getting them to both sit still and look at the camera? Hahahahaha Nope.

And gosh darn it, why is the best picture also the one with our neighbor’s trash cans in the background?

IMG_5871

But regardless Easter 2016 is behind us and frankly I’m glad of it. I got hit with a sinus infection of doom on top of having bruised my tailbone so I ended up skipping all the festivities and staying home while my husband took the girls to Easter dinner. Oh well.

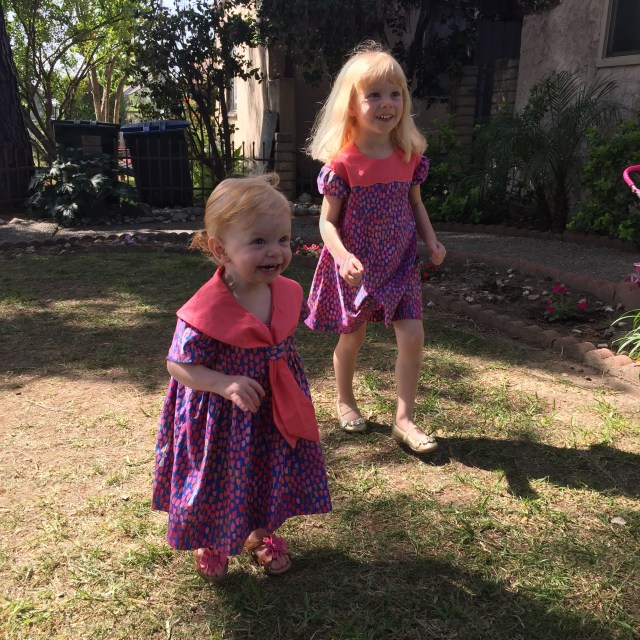
The more important part is the girls looks so darned cute in their Easter dresses!

11143352_10205756948795292_2166851377511156391_o (1)IMG_5902

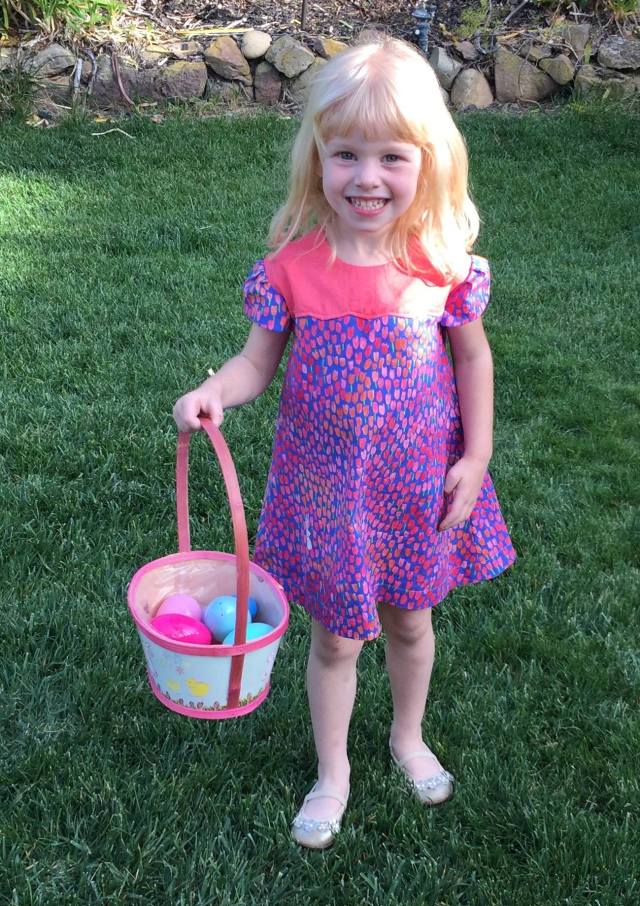
Lu was so darling in her Lily Dress from Green Bee Patterns. I feel like this is the first time I made her more of a big girl dress instead of a baby design and it shows. Hello my long legged girl! She’s gotten so tall!

The pattern itself was some what annoying so I’ll do a separate post as a pattern review, but the end result was quite nice on her. I am very pleased.

Charlie is a girl on the move! She was just thrilled to sit at her grandparents house and eat cheese and crackers and hunt for Easter eggs.

For her dress I made McCalls 6913 and OMG I loved it so much. This is the 1 year old size and it was still quite large (Charlie is just now out growing 9 month clothing), but that means she should be able to wear it all summer. The pattern didn’t include a diaper cover, so I grabbed one from another baby pattern. Didn’t end up showing, but oh well!

The fabric from both dresses is from the Sommer collection by Sarah Jane and trimmed with some Free Spirit Voile in this bright melon color. I just loved the way these are Easter dresses, but the bunnies are a small fun little surprise so these can be worn all spring and summer.

And now onto some other sewing. I’m not really sure what to do next. I have fabric for a couple skirts and I have some quilting to do, but for right now I think I’m happy to knit and relax while I recover from being ill.


Easter 2016 – Part 1

I promise! Pictures of cute girls in adorable homemade Easter dresses are coming soon! Today I’m going to talk about momma’s Easter dress. The one that I decided I needed to make less than a week ago!

IMG_5810.jpg

And oh my goodness I am thrilled I took the plunge.

It all started when I saw By Gum, By Golly’s review of the book Gertie’s Ultimate Dress Book.  A whole book about making dresses? Yes please. But ugh. I’ve been having so much trouble getting a good fit lately. Did I really need another book. Well, Tasha’s review mentioned how well the neckline fit using Gertie’s patterns so I decided to give it a try, but not before going to our local book store to give it a quick look first. What I found was a book filled with exactly the style of dresses I love most!

Lots of different styles of bodices and different kinds of skirts (non of them dirndl, thank goodness).

I was immediately smitten with the dress in the upper right corner. It features a v-neck, puff sleeve, and pleated skirt. I took a quick dive into my stashed and pulled out the dress quantity of Tiger Lily lawn I’d stashed several months back. Originally I’d planned to make another Washi for the winter, but I’ve been excited to make non-elastic waist clothes lately. Plus butterflies are totally Easter appropriate!

IMG_5814

This pattern did end up needing some significant alteration. Like, I had to make the front darts smaller and the back darts larger. I also had to make the same alterations to the skirt. That wasn’t such a big deal. Normal for me. The hardest alteration to figure out was the sleeves. Those are always always always too tight on me. But this time I was determined to get the fit right.

There was a lot of swearing and seam ripping in my house last weekend as I tried and tried again to get the sleeves to fit. Then I had a light bulb moment and pulled out my sleeve sloper. My sloper is a little old, but I figured my shoulder shape hasn’t changed that much. Worth a try.

IMG_5781

Oh yeah, that is a big difference! My sloper shows I needed a much taller sleeve cap! Once I made that discovery the whole pattern alteration process went smoothly.

The sewing process wasn’t without its bumps though.

IMG_5820

I’d really wanted to use white piping in the neckline like the rickrack in Gertie’s. I even had white piping on hand. But ugh! I just could not get it sewn in correctly no matter how I tried. Of course 2 days later I realized I’d been trying to sew piping with a zipper foot. Whoops! No sense in ripping it out by that point. I’ll save that plan for next time.

IMG_5831

I also tried sewing in my zipper 4 or 5 times. Every gosh darn time the fabric puckered at least a little bit. I eventually settled for matching facings and waist seams figuring that after taking a seam ripper to lawn 3 or 4 times it wouldn’t survive a 4th or 5th attempt. Moving on.

And really that is a minor complaint in a dress that looks really great and is so light and comfortable I’ll be able to wear it to work all summer long.

Lastly, this is what happens when you ask a 4 year old for modeling ideas. Ha!

IMG_5828


Old Stand By

The Washi Dress is turning into an old standby when I need something quick and simple to sew. After a couple of failures I needed something I could wear as our weather goes through the ups and downs of spring.

IMG_5754

And I really like this pattern. I made one more tweak to the pattern to take out the gaping neckline and it worked like a charm!

IMG_5758

In fact I think I’m going to take this pattern and make it into a full bodice pattern with a back zip and darts. We’ll see. Might be worth playing around with because I feel like it is one of the most flattering things I’ve made in a while.

IMG_5755

The fabric is my favorite print from the Good Hair Day line by Kim Andersson from Winham Fabrics. As far as quilting cottons go, this is top quality. It hardly wrinkled after its initial washing or after being worn all day which was a pleasant surprise!

Now back to sewing Easter dresses and testing out my ideas.

Photographs Can Be So Helpful!

February was a pretty frustrating sewing month. As you already saw with my previous post, finding the fit I want has been a bit elusive. But I’m okay with that. I knew I was going to encounter some issues as I tried my hand at new and non-cup size specific patterns. But the weather has also been really warm recently. We had the warmest February on record and all those long sleeve jersey dresses are not quite as practical as I planned!

I’ve also been thinking about shape. What kinds of skirts shapes am I gravitating towards and where do I want the waist to hit? I had this epiphany while taking a ballet class. I hadn’t taken a ballet class in over 4 years, but decided to go back to it recently. And this is what I’ve been wearing (sorry about the red-faced post class photo).

IMG_5429

So something somewhat fitted, but not overly clingy on top (t-shirt from MischiefMadeMe), waist defined at it’s smallest place, and a skirt that is more of a circle shape that ends above the knee. I feel good in this. So good I don’t have the desire to cover up going to and from class.


Now lets look at what I was sewing this month.

First up is the Emery Dress. I’d made one of these before in corduroy. It’s cute, but the dark fabric made it hard to see the fit issues. So I bought some very cheap quilting cotton to work up another version.

IMG_5451

From the front I’m really happy with the shoulders and bust. I ended up going down a full size then adding a FBA and I think it works. Some slight pulling on my larger bust side, but not bad. Looking at this in the photos I can see the waist is too low. The neckline is also pretty high for me. I feel it makes my bust look lower than it is and doesn’t leave enough visual space between my bust and where I’d like the waist to hit.

IMG_5455

And then there is the back. Whoops! I’d asked Christine Haynes what she thought of the back gaping and from the photos I sent it did seem like maybe the shoulders were too wide. But she also had suggested maybe the back was too long. I didn’t think that was true from studying myself in the mirror. Wrong! My husband took this photo and d’oh! Yeah. Back is too long.

So in the very near future I plan to wack off the bottom of the bodice and also add a sway back adjustment and see how I like it. It is such a classic pattern that I’d love to figure out the fit so I can adapt.

I may removed some of the fullness from the waist of the skirt and make it more a-line. We’ll see.


February  was also when By Gum, By Golly’s had a series on a wrap top. I haven’t spent too much time on vintage styles lately, but a knit wrap top ticks all my boxes. Vintage inspired – check! Comfy yet chic – check! Creates a nice neckline and defined waist – check! Pairs well with dresses – check!

Turned out I had Cake’s Pavlova Wrap Top pattern. It is so similar to the pattern Tasha used that I figured it was worth a try.

The day I made this pattern was one of those days. The kind where you apply fusible interfacing to the right side of your fabric, and accidentally seam rip holes, and sew on the sleeve bands with the wrong side facing (but only on one side).

IMG_5462

But overall not bad! I only wish I’d learned my lesson from sewing Cake patterns in the past and sized down. This is a size 40 and it’s pretty generous. Next time I’ll try the 35.

IMG_5464

I also might play with the way the ties are done. Maybe. I have some gorgeous pink wool jersey I’d like to use for a future version, but I think I need one more test in the smaller size first. And now that time has passed since I made this I’m feeling more positive.


Anyways, what do you think? Are these worth trying again?

Also thank you to everyone who commented for a cause on my anniversary post! I ended up making a a flat contribution instead of just going by the number of posts, but the feedback you provided was incredible helpful. Thank you!

Taking a Chance on Lisette

Not much to say lately as I’ve been toiling away working on fitting patterns made with woven fabric. And so far…the progress is not great.

This week I decided to try my hand at one of Liesl Gibson’s dress patterns from her Lisette line, B6168. Let’s just say it didn’t go well.

The first version I made was a size 12 with a full bust adjustment and a large bicep adjustment. I did this based on the finished measurements of the pattern. But it was too tight. I got it zipped, but it was too tight to breathe. I also made mistakes every single step of the way. Every make a mobius bodice? I did!

So then I moved onto a size 14 with a full bust adjustment and full bicep adjustment. This time in a linen blend for the top and a length of Loominious for the skirt.

IMG_5569

And ugh! That gap in the front is terrible. I put a snap there to see if it will help, but nope! This is also after trying various things to get it to lay better. I think partly the fabric is too stiff. And that might get better with wear. The bodice also seems too long maybe? But above the bust? Perhaps.

IMG_5570

I also put in a sway back adjustment which made the back fit a lot better! But the biggest pain are the sleeves. They are still so very tight. I always knew I have large upper arms, but it feels very sad to know you already made them bigger and they are still much too small.

My husband said I should do a sassy pose, but ugh! I feel anything but sassy in this.

IMG_5571

So I think I’ll move onto another pattern for now. I need to try something with fewer pieces.


Fabric Choice Matters

I only started sewing knit clothing for myself less than a year ago, so I have a lot to learn about fabric choice! I tend to lean towards using natural fibers whenever I can. They just breathe so much better than most synthetics and it is hot so much of the year here. But sometimes I forget a blend can really help, especially when mixed with cotton.

Both of these dresses are made with my Washington Dress hacked to have a lower neckline and half circle skirt. Someday soon I’ll get a tutorial written up.

This first dress is in Valori Well’s Wish Knit in Passion. I saw someone made an Appleton dress in this fabric and I loved it so I bought some. And it is so pretty in person, but also much heavier than I expected and 100% cotton it seems. I got shy about doing an Appleton as I had planned because this fabric doesn’t have great recovery and doesn’t seem well suited to being pulled tight and tied. So new plan.

IMG_5204

I juuuuusssst made it with the 3 yards since I wanted long sleeves. So the pattern matching isn’t quite perfect, but pretty close. But what isn’t quite as apparent in the photo is it pulls across the bust when I first put it on. Then as the day goes on the dress relaxes and then relaxes some more.

IMG_5207

But I have to say I don’t hate it. It is incredible comfortable to wear. Plus, even as the dress relaxes the silhouette still shows off my waist.  All of this was a total accident! A happy one.

The second dress is in mystery fabric I picked up off the $3/yard wall at M&L Fabrics. Who knows what this dress is made of. I’d guess cotton with something else. Maybe bamboo? Nylon? Something with a bit of sheen. Like I said, still learning.

And another fabric I bought with Appleton in mind, but then this one seemed too sheer. So hacked Washington Dress to the rescue again!

IMG_5376

Derp! I’ve had to take photos first thing in the morning recently and I swear I’m still asleep in these. But dang, this dress was another happy accident. I’m not keen on the flower placement in the front, but again only had 3 yards to work with and tried my best.

IMG_5377

Regardless of fabric content the drape is great. Just perfectly falling toward the hem. And even though it has long sleeves I should be able to wear it well into spring since the fabric is so light.

I’ve been on a big quilting kick lately, but I dug through my fabric bins lately and remembered all the gorgeous wovens I’ve been hoarding, so soon enough I’ll have to move on to those. Spring is not far away!

Goldilocks and the 3 Monetas

Colette’s Moneta is an incredible popular knit dress pattern. It has a wide size range (33-54 inch bust), is simple to make, and a nice easy silhouette to wear. But I seem to be the one person in the blogiverse that was an utter failure at making this pattern.

Exhibit 1 – This dress is too big!

IMG_5221

Here I am in all my weekend mom glory. Comfy dress, Anna stickers from Frozen, and slippers because I was spending the afternoon sewing.

This was my first attempt at making Moneta and at first I really liked it. It is super comfy! But with time it has gotten saggy and frumpy looking. Based on the pattern envelope recommendations I made a L in the shoulders and graded out to an XL from the underarm down. Mistake! The sleeves have huge bags of extra fabric. The neckline is huge! The only part that worked was the waist.

IMG_5224

Oh my gosh, the back is just as bad. Look at how low the waist sits! The whole thing is huge. Thank goodness for cardigans to hide most of this when I wear it. Did I mention this was the length for 3/4 sleeves? WTF is that about? I do not understand patterns that mark elbow sleeves as 3/4 sleeves. Not the same pattern companies!

The fabric is a lovely interlock from Robert Kaufman that my friend gave to me, so I am sad this dress was such an utter failure.

Exhibit 2 – This dress is too small!

So then I regrouped and made another version in some Art Gallery jersey I had on hand.

Moneta 2 Front

This time I cut a large for the shoulders then graded to an XL at the waist. I also narrowed the neckline and swapped the sleeve for the pattern from Cashmerette’s Appleton Dress pattern.

Actually the dress looks okay from the front. Sleeves look a tiny bit tight, but not too bad. So let’s look at the back.

Moneta 2 Back

Eek! What the heck? Still too long in the back length of the bodice, but the worst part is my arms look like they are eating my sleeves. Sob! Another dress that looks okay with a cardigan, but I feel awkward wearing it on its own.

At this point I put the pattern in time out. Bad pattern! Bad sewist for not thinking the fit through!

Exhibit 3 – Goldilocks gets it right!

Well then last week while I was coming off the high of finishing a few well fitted dresses  I thought I’d pull out Moneta and see if I could hack it into something better. Plus I’d stocked up on some $3/yard bargain fabric so if the dress failed, I’d only wasted about $10 including tax.

IMG_5182

Bam! Success! The elusive 3/4 sleeve didn’t quite happen, but that’s a very easy fix next time. Beyond the sleeves I love everything about the fit.

So, how did I make it happen? Well I did it by drafting the Moneta neckline onto Cashmerette’s Washington Dress bodice. Then I used the Moneta skirt as is. The drafting took a little time, but now that its done I could make this pattern again in a snap. Plus doing a little math can be fun!

IMG_5184

The back turned out pretty perfectly too. It’s meant to be clingy, especially in this Robert Kaufman jersey, so I don’t mind the closer fit. At least its a dress I can wear without a cardigan and feel comfortable which seems like a huge achievement in getting used to my post two kids body.

In the end, I am starting to think that even with the extended sizing Colette’s patterns just don’t suit my shape. I’ve made 3 or 4 now and they have all been terrible flops even with careful measurement and fit tweaks. The problem is that most indie pattern companies design super casual clothes. So, anyone know of a pattern company designing slightly more professional dresses that go up to a size 16 or 18? Otherwise I fear I might be headed towards drafting my own, but I’ve always been better at modifying than drafting from scratch. Hmmmm, something to ponder.


Put a Bird on It

Happy New Year! Yay for 2016! Here in Pasadena the Rose Parade has marched down Colorado Blvd. and the Rose Bowl game has been played. Time for our little city to calm down and start getting ready to return to our regular routine.

I managed to eek out a little more fabric and sewing fun during our holiday break. On New Year’s Eve we took a family outing to see some friends on the other side of town. On the way back my husband wrangled our overtired kids so I could make a stop at The Fabric Store! I’ve been eyeing their merino jerseys for a while, but it isn’t easy to make it cross town with two small children. I was so glad to finally stop by and I wasn’t disappointed. IMG_5139.jpg

I bought two lengths of jersey to make wrap dresses. One is emerald green and the other is sort of a soft mauve color. Wool might seem a little silly in our climate, but I wear wool nearly every single day. It is so breathable! Plus both fabrics are fairly lightweight with a nice drape. And wrap dresses are so great for work wear and flattering as well.

And as if friend time and fabric shopping wasn’t enough, I also wore my new Appleton Dress for the whole day to see how my fit adjustments would work out. And the answer is…nearly perfectly.

IMG_5144

This version is made with one of the kits Jenny sold when the pattern was first released. I held onto the fabric because I was nervous about sewing with a rayon blend. But now that I’ve worn my two Appletons many times I had a much better idea how they fit and what changes I wanted to make.

IMG_5146

The biggest change I made was to lower the waist by one inch. This was tricky because there are no markings on the pattern to do this sort of alteration. So I ended up finding a nice small point between darts to add the length. Thankfully it worked! I cut both fronts the same so I’d have more overlap. Then I cute the neckline trim pieces a little longer to account for the extra length. That was the only fail. The neckline needed to be a tad bit more snug. Lastly I took some of the fullness out of the front armhole and now the front lies so smoothly. Perfection.

IMG_5142

This dress will fit perfectly into my work wardrobe and I am so happy to leave 2015 with a bang! I cannot wait to keep tweaking and hacking patterns in 2016 so I can have a whole me-made wardrobe of custom fit clothes. Having a good fit really make me feel a lot more confident about myself. It’s super exciting.

And this time Dottie got in on my photo shoot. Silly dog!


But You Don’t Even Like Cats Dress

Back in early November I came home from my local quilt shop with 3 yards of Lizzy House’s Hits Parade jersey in a cat print. As I’m showing my husband he blurts out, “But you don’t even like cats!” Ha! He has a point. I’m not much of a cat person, but that’s because I’m allergic to them. In fact I think most cats are quite cute, I just can’t get near them. But dang I love this fabric like, whoa. It’s so fun. Kitties!

IMG_4658

The fabric sat on the counter in the kitchen for weeks while I worked on various holiday projects and that whole Victorian get up until Sunday when I finally had the head space to tackle sewing math. Math is fun!

The resulting dress is 1 part Washington Dress, 1 part hack, and 1 part self drafted. I am so freaking excited about how it turned out! It looks just like the dance dresses I wore and loved back in the 1990s.

IMG_5121

So here’s the break down on how I turned the Washington Dress into more of a skater style dress.

First off I had to tackle the fit issues I encountered when I made my original Washington. Straight from the envelope I have two issues. The bodice is too short so I traced out the pattern, sliced along the lengthen here line, and then added 1 inch in length. I also took out some of the fullness I was getting between the armhole and the bust with a small dart. Both were easy alterations to make and I’ll be sure to do them whenever I make the Washington bodice in the future.

IMG_5123

Next up was figuring out how to achieve that sweet 90s style ruched neckline. I knew I could turn to Tilly and the Button’s Agnes pattern. It is so very cute and I love the style, but I really didn’t like the idea of purchasing a pattern just to look at one pattern piece. Especially since I’d achieved such a great fit with Washington. So instead I decided to try working it out myself and if it looked terrible I would purchase Agnes.

To alter my existing pattern, first I traced out the front bodice onto some swedish tracing paper (love that stuff). Then I lowered the neckline. I knew if I started the ruching as high up as the original neckline it would look kind of odd. I think I lowered the neckline about 2 inches and re-drew the curve. Before sewing the bodice pieces together I cut a piece of 3.5 inch long 1/4 inch elastic and stitched it down the center front, pulling the elastic along the way. Worked out pretty perfectly. I also cut the neckband piece to be longer and accommodate the lower neckline. I usually forget this part, so I’m glad I actually remembered this time!

IMG_5124

For the skirt I turned to my handy reference book Patternmaking for Fashion Design. Drafting my own patterns always makes me feel like a total badass, but this book makes drafting 1/4, 1/2, 3/4, and whole circle skirts so easy. I measured the waist of the bodice and then looked at Patternmaking’s handy chart for figuring out the waist radius. The next part was the only hiccup in the whole process. The first skirt I drafted was a 3/4 circle. I wanted a lot of fullness. But it was not to be. The kitty fabric wasn’t wide enough for me to cut a knee length skirt and still have the kitties facing the right direction. So I flipped back to the chart and drafted a 1/2 circle instead. No big deal. The skirt still has a decent amount of fullness and now I won’t have to worry quite as much about accidentally flashing people if a breeze comes along and lifts my skirt.

Spin skirt spin!!! Weeeee!!!!!!!

The fabric was really nice to work with. It is thin and not terribly warm, but also didn’t curl up as much as other jerseys I’ve used. I only wish it came in more adult prints. I love the kitties, but I’m not quite sure its work appropriate. I work at an arts school, but even they might find a cat dress a little much. We’ll see. I’ll probably have to wear it at least once to see my boss and her friend get excited by the kitties!!!!!

I’ve already made another one of these bodices as a tester and it turned out so nicely that I want to add a skirt. Just need to pick out fabric and I’ll have two of these beauties. I’m also glad to have found more use for the Washington pattern. It’s nice, but also very distinctive and by switching up the neckline and skirts I’ll get a ton of use out of it.


Washington Dress

This week I managed to finish up my first version of the Washington Dress from Cashmerette! And of course I couldn’t be a reasonable person and make it as shown on the pattern. Oh no, of course not. I had this idea of making it drop waisted and as you can see it was only sort of successful.

IMG_5046

Pros:

  • It is so so so comfortable. I wore it all day and it was so great. Like wearing pajamas.
  • Now that I’ve hacked it I know what I did wrong.
  • I used random fabric from my stash so this was a low cost way to test my ideas.
  • My husband really liked this dress and thought it was very interesting with the curve towards the side of the hip.

Cons:

  • I think I don’t need the hollow chest adjustment like I’d thought. I need to adjust the armholes instead like Emily originally commented on my Appleton. Doing the hollow chest alteration didn’t work. Oh well.
  • The bodice was drafted is too short. I’ve noticed this on my Appleton’s too. The waist is too high and I’m not even close to the amount of negative ease the pattern suggests. Maybe that means the dress isn’t anchoring at my waist, but next time I’ll be sure to add length.
  • By hacking it together I un-did the sway back adjustment. That was a terrible idea. I had a huge amount of pooling at the back. I took 4 inches total in two darts. It helped, but not quite enough.

IMG_5048

With all that said, I think lengthening the bodice would have fixed some of my fit woes since everything below my bust is sitting a little too high. I am contemplating adding a contrasting waist band to see if that helps.

The fabric used is Valori Well’s Quill Interlock. It’s out of print now, but dang. I wish I had 3 more yards. I love this print so much. My friend gave me 2 yards which was plenty for this long sleeve top. The skirt fabric is some mystery poly blend I’ve owned for who knows how long.

My final word on the Washington Pattern for now is…uh follow Jenny’s directions? I’ll be making another one soon, but I have to take stock of my fabric first and probably buy something new. I’d really like to try it in a solid knit top, but my only dress quantity on hand doesn’t have enough recovery for this pattern. So I’ll add it to my list for 2016 sewing. In the mean time I’ll be wearing this version with this perfectly matching cardigan and enjoying the comfort. When in doubt…put on a cardigan. It covers all kinds of fit woes.

IMG_5045