1918 Winter Ensemble

The museum is already planning Lamplight for 2019, so let’s look at what I made for last year’s program!

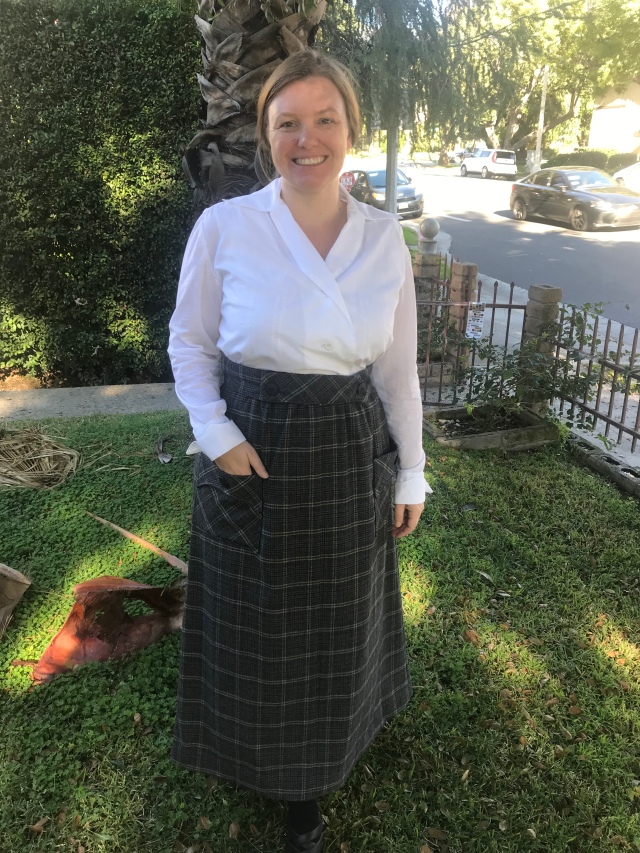
The 2018 holiday program at the museum picked the very boring fashion year, 1918. Our costume coordinator on the night of the performance said, “I think pretty good considering.” Ha! The late 1910s do have a pretty subdued palate, but I think I did pretty well on our limited budget. I ended up pulling everything from my stash except the skirt fabric! No way I could have done that if I’d needed a bustle dress, but 1918 is a pretty tame fashion year.

img_3899

But for fun, this time I thought I’d show you the under layers too. All these historical looks take some serious underwear and even though the 1910s are more relaxed, there are still underclothes.

The bottom most layer is a chemise. This is one I made years ago and I wear it under any light colored ensemble. Is that historical accurate? Heck no. I don’t care. Chemises din’t change a huge amount , so I think its good enough. I’m also wearing knee high stockings, sturdy shoes, and an underbust corset. I bought the corset, but I’m starting to maybe think on making my own. Or even better, do a trade with another costuming friend to see if we can do a skill trade.

Next up is a corset cover and petticoat. This corset cover was made last year when we performed Cinderella. I swapped the red ribbon for a white one and even though the cover was patterned after an original from 1880, the style was super similar to the 1910s. The petticoat is new! Nothing I already owned was short enough and shaped correctly. Thankfully I had left over black twill from Lu’s halloween costume. It wasn’t much, but by stitching a few panels together, I had just the right amount. Thank goodness I saved that strange shaped remnant.

Next, the blouse! Made with remnants from the girl’s baptism dresses using Wearing History’s Elsie 1910s WWI Era Blouse. It came with the original instructions that are best described as brief. But the blouse was similar to others I’d made so I was able to muddle through.

Finished with a skirt of plaid purchased from Renaissance Fabrics. I love their selection, reasonable prices, and fast shipping! The pattern is the 1918 Ladies Two Piece Skirt from the Vintage Lending Library. It also came with original directions that were pretty confusing, but Wearing History’s YouTube channel came in VERY HANDY!

So that was my sewing for last year’s Lamplight program. Next up…the knitting!!! We had a super tight budget last year so I am so thrilled with how much I was able to source from our own home.

Make Nine – Take 1

This year I’m trying the Make Nine Challenge. I’m not usually very good at sticking to these things, but ha! Why not keep trying? Thankfully I’ve finished my first look of the year. In fact I finished it back in January so I’ve had a chance to wear it many times already.

img_4077

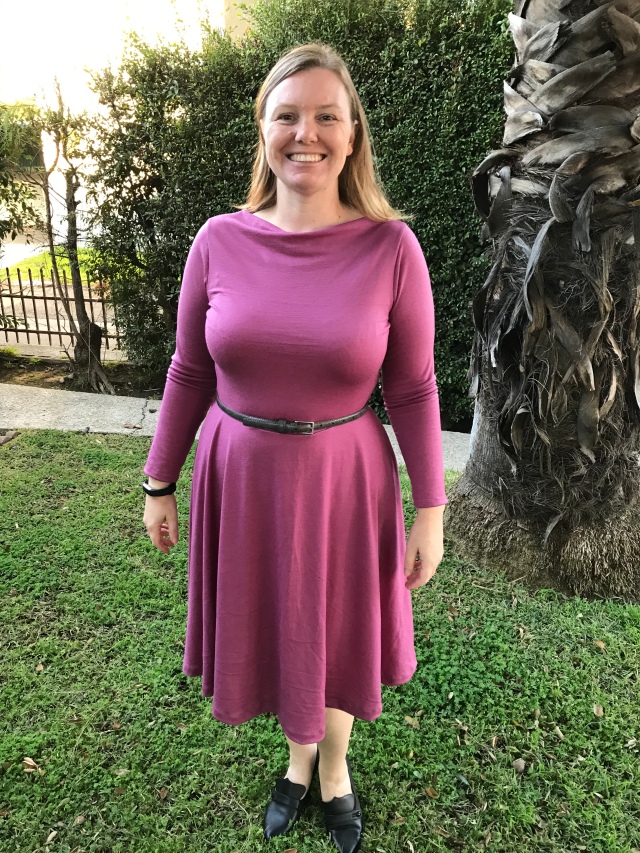
This is the Washington Dress from Cashmerette and I hacked it to have a cowl neckline. I’ve used the pattern a ton of times now to create different looks and it’s worked pretty well. This time I sized down to a 12G/14 and I like the fit!

img_4078

I will say the cowl neck is not at all as dramatic as I wanted. I was tentative when I was drafting the pattern and could have gone far more extreme to make it lower. But this is make from wool jersey (from the Fabric Store) and it doesn’t have as much stretch as say, cotton/lycra jersey. Ohhhhh, and right now I’m having an inspiration moment. My friend recently gifted me a sack of fabrics including a dark purple rayon jersey. Now that would have made a better cowl neck dress.

img_4080

Regardless, this pink wool version is super comfortable and though it looks tight when I first put it on (like in the photos), it relaxes a bit with wear and feels so lovely. We’ve had a cooler and wetter winter this year and the high neck has turned out to be a blessing on all those windy winter days. So I call this a success!

Jalie Gigi Bikini Party!

Last March my family went on a trip to Hawaii! It was a trip my husband had been requesting for our entire relationship and finally we had a good enough financial streak to make it happen. Hawaii is not cheap!

As usually happens about one week before our trip I became absolutely obsessed with making a new bathing suit and matching suits for my daughters. I made matching suits 2 years ago and they were so fun. We definitely turned heads around the pool. Also, where did my babies go? All I have now are kids! No babies!

This time I turned to the Jalie Gigi Bikini which comes in size toddler 2 all the way to the lower end of women’s plus sizes.

img_1776

After taking this one photo on our last full day in Hawaii I then proceeded to get incredibly and horribly sunburned. Multiple sunscreen applications did no good against such a strong sun. Our new suits sat unworn for months.

img_2829

And then we pulled them out for a family trip to the beach just before the school year began again. It is miraculous that the girls suits still fit after so many months of growing. If you’re interested in how my suit fits I did a write up with the Curvy Sewing Collective. I like it pretty well, but there are things I’d change if I made it again.

img_2833

The kid suits turned out really well, but I wish I’d added more length to both. Charlie at nearly 4 years old still is too small for the smallest size according the Jalie patterns and Lu at 6 years measures somewhere around a size 3-4. But both girls are more average in height. I know I made Charlie’s as a straight size 2, but I can’t remember what size I used for Lu. I added length to both pieces, but it still doesn’t cover as much as I’d like. Much sunscreen has been applied for these beach trips!

img_2828

The fabric is the prettiest swim fabric I’ve ever seen. Its from Liberty of London and I bought it at The Fabric Store (LA location before it closed). I think it must have been a defective roll because the price was not this high. Plus there was a big seam down the piece and some discoloration along the selvedge. The Fabric Store generously gave me extra yardage to make up for the flaws and that’s how I was able to make 3 swimsuits with the fabric I’d purchased to make one for just myself. Actually, I made 4 because Lu’s doll got a matching swimsuit too!

img_1616

This project was so so so fun. I’m really enjoying making these matching projects while my girls will want to match me and have doll clothes too. Right now I’m making them coordinating gymnastics leotards and they have coordinating Halloween costumes in mind too. The girls don’t always play nice, but it is clear they love each other.

img_2803

And happy birthday to my own mommy! She’s moving away soon and I’m going to be just crushed to see her go. I love you mom! Thanks for providing me a good example of parenthood.

Ottobre Norma Blouse and the Dress Like Your Grandma Challenge


This year I just barely managed to participate in the Dress Like Your Grandma challenge Tanya (of Mrs. Hughes fame) made into an annual event. I aspire to sew as many vintage patterns as Tanya manages to produce! Anyways, I didn’t have a ton of time available to tackle this look and so I’m not quite pleased with what I was able to put together.

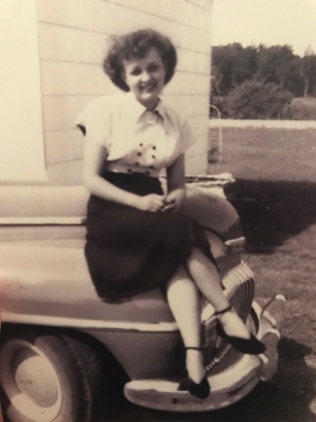
My mom’s mom is on the left looking saucy and rocking those ankle strap shoes. I’m not sure when this was taken, but my grandmother’s always been a bit of a ball buster. Definitely not one of those soft and sweet grandmothers who bake cookies. She’s more likely to ask me when I’m going to lose weight and can I sneak her some Jack Daniels? But she loved my grandfather and they are so adorable in the photos from their youth. Based on their wedding year and the fashion in this picture I’m guessing this is when when they were dating. (Any idea mom?)

img_2149

Trying to find a blouse pattern like Grandma’s was really tough. I didn’t have time to draft my own and I didn’t see anything readily available to download. Ottobre Magazine sent me a couple magazines to try out so I flipped through the pages and found the Norma Blouse. It’s a really cute little 1940s style shirt with a yoke at the shoulders, gathers at the shoulders, and fish eye darts for some subtle shaping.

I’ve never tried an Ottobre pattern before this, but the blouse turned out really nicely. Maybe a tad big in the shoulders, but I was trying not to do too many adjustments. Aside from blending sizes (44/48/50) I also did a full bust, sway back, and full bicep adjustment. I feel like I’ve been overly picky with fit lately and it was nice to just step away and accept the finished project instead of over analyzing it.

I also haven’t made a blouse in years. Or frankly anything with a button front. Unfortunately I probably need a touch more bust room, but otherwise I think I did a pretty good job making a professional looking shirt. I feel like my breasts look SO BIG in this and yet I probably do need to go down a size and do an even larger full bust adjustment.

img_2146

The Norma blouse was super easy to sew together. Ottobre sells magazines in English and that’s a big plus! I’m working on a project from another European magazine and it is just not as smooth trying to translate sewing terms.

The fabric for this blouse is the leftovers from the girls’ Baptism dresses and it was just perfect for a blouse. I’m really getting my money’s worth out of this purchase The Fabric Store. I still have even more!

So what do you think of the fit of this blouse? Does it look okay? Or is it worth narrowing the shoulders and doing an even bigger full bust adjustment? I think it is worth keeping this pattern and using it again. My husband said this is his favorite thing I’ve made in a long time and it is a pretty wonderful shirt.


Baptism Dresses

This spring felt a bit crazy for our family, so I’m playing a bit of catch up! We decided to take a family trip to Hawaii over spring break and it was wonderful. Our littlest one keeps asking to go back (like every single day, multiple times) and our older daughter loves volcanoes so she’s very interested in the eruption taking place right now. I mean how often does a 6 year old visit a volcano and then have it erupt a month later? Pretty cool in her world.

Then we got home. Our plane landed at the airport at midnight and that very same day we had to get ourselves together to attend Baptism class at our church. I’d always intended to baptize our kids, but before last June we were very infrequent attendees of services. Since June the girls and I have attended nearly every week. We love our new church home! So I started seriously looking into having the girls baptized. I opted for the mass baptism date held as part of the Easter Vigil services so that it would be easier for friends and family to attend, particularly my mother in law who would be traveling quite a distance (hi Widget!).

img_1860

Our kids were the oldest and I was tempted to make their dresses in something other than white. Delicate white fabric is not really the best for rambunctious kids who have a mother who likes to procrastinate on the laundry. Tradition won out and so the girls wore this darling white dresses.


For inspiration I turned to this sweet little dress at the V&A Museum. The original is from about 1870 and made with velvet with satin ribbon and lace. I just love this dress so very much.

img_1889

Poor Chi Chi. Easter is so rough on 3 year olds! Anyways I think my version of the V&A dress makes enough of a nod to the original, but these were a little easier for me to make under a deadline. Plus I just could not afford that amount of lace and ribbon times 2 dresses! I splurged on some lovely trimmings, but there is a limit to what I’m willing to spend on a one time use garment.

The fabric is some lovely super sheer shirting I grabbed at The Fabric Store. I bought 8 whole yards! Way too much, but now I have plenty of leftover for another project or two. Then I lined them with cotton lawn. The lawn was a slightly different shade of white, but it isn’t noticeable in the finished dresses.

img_1861

I drafted the pattern from The Building Block Dress from Liesl Gibson. It’s a genius little book that is well worth the cost. I’m not afraid to slash and spread a pattern, but it is nice to have a little hand holding from a trained professional. I used the basic bodice with a puffed sleeve and gathered a-line skirt. Thankfully the bodice size for both girls was the same as at Christmas so I could use those dress patterns as a starting point.


I doubt these dresses will be wore very frequently, but they did turn out so perfectly and I’m glad they got at least two days of wear out of them, Baptism and Easter. As for the baptism ceremony, the girls were just perfect. So happy to participate and then come home for cake and presents. Just as fun as a birthday!

Washington Dress – TNT

Greetings! I’m finding myself quite recovered from the Thanksgiving holiday and am gearing up for the Christmas season. As I mentioned our lives have been quite full lately and a big chunk of my time has recently been taken up by church. I’m not here to prattle on about religion. I promise. But church is a part of my life again. Partly because the political climate makes me nervous, partly because I have two little girls and want to give them a solid religious base, and partly because I was really missing the community church brings into one’s life.

For most of October and November I’ve spent Sundays going from service, to sunday school, to grocery shopping, then back to church for New Members Class. It was exhausting, but also fulfilling and I’ve met some pretty nice and welcoming people. I had planned to make a new dress for the service when new members are introduced. The dress is even mostly put together, but well…it wasn’t quite right. I used rayon challis and it will be a lovely spring dress (maybe Easter?), but it wasn’t right for November. Plus I need to take out a huge chunk of length from the back and that means a lot of seam ripping. I just did not have the time for such an endeavor.

So I set aside the rayon dress in favor of something quick and easy, a tried and true pattern. Yep, my favorite winter dress, the Cashmerette Washington bodice with a half circle skirt. I’ve made it several times and knew I could whip one up in just a couple hours.

img_1104Tada! A nice fresh dress to kick off the winter sewing season. Soft and lovely and forgiving to wear.

I don’t really have new to add to my thoughts on the pattern. I’ve used it several times and it always works well. This time I added a touch of ruching at the bust.

img_1105

The fabric is Liberty of London Ganton Jersey in the pattern Meandering Chrysanthemum. I purchased it at The Fabric Store in LA a few month ago for what must have been a clearance price. Something like $16/yard when Liberty jersey tends to go for double the price. Usually I like a bit of lycra in my jersey, but this 100% cotton version was too nice to pass up. It reminded me of the fabric I used for my very favorite winter dress. In practice it was hard to find the grain of this jersey and I am wondering if there was a reason it was so cheap.

img_1106

I think I’ve mostly avoided the dreaded flower boob in this one. It was a close call with so many blossoms closely placed 🙂

Anyways, this dress was originally intended for Thanksgiving. I figured it would look nice for photos and also be comfortable for the 5 hour drive to Vegas and eating massive amounts of food. I was right on both accounts. I give the dress two thumbs up. It also had me feeling confident while standing in front of hundreds of people in church. Now to sew up the two more dress quantities of fabric I ordered this month. Once I pulled out my winter dresses I realized I have about 5 days worth of work clothes. Not quite as much as I’d like. Plus some of the things I packed away looks a little worse for wear after spending the summer in a plastic bin.

And if you’re interested in other sewer’s favorite patterns, I hope you’ll check out the Sewcialist’s Tried and True Month. It is really interesting to see what styles people pick to make again and again. For me, this skater dress style is now a staple of my winter wardrobe. Easy to make and easy to wear.


The Laneway Dress

Oh August, you really got the best of me. I had plans for at least two items this month, but it looks like I’ll only finish one. Thank goodness for deadline sewing? I thought I’d have more free time, but instead I got all wrapped up in back to school preparations for both home and work. I had no idea getting Lu though the first two weeks of kindergarten would be so exhausting for me!

My lone August project is The Laneway Dress from Jennifer Lauren Handmade. Back at the end of July, Jennifer put out a call for pattern reviewers. I don’t usually volunteer for such things, but I love her clean and classic vintage vibe. I also sympathized with her problem. Pattern testers are great for making sure your pattern is well drafted and error free, but test versions are not always great for promotional purposes. When looking to purchase a newly released pattern I always look for examples, but I don’t want to see tester versions. Test versions are not using the final product, the one I’m paying good money to purchase. It seems I’m not alone in my desire to see final versions of the pattern before making a purchase. A quick glance in Facebook groups, blogs, and Instagram will give you a sense of how well a pattern works in the hands of other home sewers, but that only works if those patterns get sew up right away.

I volunteered for a selfish reason too. Jennifer recently started including cup sizes up to D in her patterns and updated her drafting. I definitely wanted to see if the drafting changes would work in my favor! When The Laneway Dress came up for review I frantically emailed Jennifer from the terminal in LAX hoping I would be selected as a reviewer. Success!!!

img_0728

Oh the finished dress is so lovely, but it took a little work to get here. I started with a muslin in size 16D at the bust and 18 for the waist and hip. A couple problems were apparent from the beginning. 1) The shoulders were too wide. 2) I needed more room in the front waist and less room in the back waist. Both of these fit issues are really common for me.

Last time I did a really detailed muslin process I was just making it up using common sense, logic, and internet tutorials. This time I purchased a copy of the popular sewing book, “Fit for Real People“. What I learned is that a lot of my instincts were good.

img_0729

To address the too wide shoulders I put on the muslin bodice and drew in a line where I wanted the shoulders to hit. Turns out they were 1 inch too wide. With a new armscye  the whole bodice sat much better.

The sleeves miraculously fit pretty dang well right out of the envelope. I almost always need to do a bicep adjustment, but this time there was enough ease! The only alteration done to the sleeves was to increase the height of the sleeve cap to fit the new armscye. I have never had sleeves sew in so smoothly. Not a single pucker!

Next I altered the waistline to give me more tummy room. A lot of people make this adjustment at the side seams, but I prefer to alter the darts. I just made the legs of the darts .25 inches wider in the back and .25 inches narrower in the front. The circumference was perfect out of the envelope. I just needed it distributed in a different way. Thankfully I remembered to alter the skirt too by adding .5 inches to the front skirt piece. Technically I should have also removed .5 inches from the back skirt, but I always need extra booty room so I left the back skirt the same width and eased the extra skirt width in at the waist.

img_0732

After altering the shoulder width and darts there were just a couple tiny fixes to make. 1) I squared the shoulders and 1)  I did a slight sway back adjustment.

This probably sounds like a lot of adjustments, but in reality the only major adjustment was the shoulder width. Everything else was just drawing slightly different lines on the pattern pieces.

In full disclosure, Jennifer sent testers the pattern for free, but she asked for complete honesty, so I’m giving it here. Aside from the fit alterations things went really smoothly. The pattern was easy to download and I liked the way it was tiled so I  only printed the pages needed for the D cup dress. The biggest gripe I have about taping the pattern pieces is there is no grid of notches to help you match pieces. I found it easy enough to match things on the bodice, but with so much blank space the skirt was a bit more of a challenge. I hope in the future Jennifer will add some sort of feature to ensure better accuracy during the pattern taping process.

The construction was pretty straightforward. I’ve made a lot of dresses so I took a glance at the order and then took off without having to give them another glance. If you’ve made any other basic woven dress, you can make this one too.

img_0730

Stylistically I think it is a cute basic dress. I love the three different necklines and it would be easy to adapt another pattern to include this detail or use your sloper. That had been my original plan until Jennifer Lauren’s review announcement. I also really like how the pattern has open ended darts. It is super bust friendly because you don’t have to worry about the darts ending in exactly the correct place.

img_0731

And oh look at that fabric. I think it might be my favorite part. The print was purchased at The Fabric Store back when Jenny from Cashmerette came to LA for a visit. It is hard to tell in the picture, but the background color is a deep navy, my favorite neutral. I always find myself drawn to darker colors as fall approaches, but it is still rally damn hot here. This fabric is super light though and incredibly similar to a Liberty of London lawn.

My husband thought it was “a lot of print” before I added the contrast facing. The facing fabric also came from The Fabric Store, but was purchase specifically for the Laneway Dress. Lu and I took a side trip to look for fabric on our way to LACMA and after walking the whole store I just could not get this sheer stripe out of my head. The color matched perfectly, but I could not figure out how to interface such a sheer fabric. In the end I flatlined it to a piece of the main print and that method worked really well. Both fabrics are also cotton so laundering should be easy.

The finished dress fits pretty darn well. Is it perfect? Of course not! But I wore this dress all day to work and the ease and fit suited my lifestyle well. If I’d taken out all the ease and wrinkles the dress would have been too tight for carrying children, buckling car seats, and using a desktop computer all day. I also got multiple compliments on my Laneway and who doesn’t love compliments?!?! Now I’m thinking I should make another. Maybe with a different neck treatment?


Happy Birthday to Me!

I squeaked out one more dress for 2016! I really didn’t think I had the time, but the fabric was washed, the pattern was something I’d made before, and I had a couple free evenings! Plus my birthday was falling in a pocket of cooler than typical weather.

This is Cashermette’s Appleton pattern in some gorgeous green merino wool jersey from The Fabric Store. I’d purchased the yardage last December on my first visit to the Los Angeles location, but then I started to doubt my ability to sew with it!

I’m glad I waited. This past year I have learned a lot about sewing knits on my Janome. It doesn’t have the lightening bolt stitch so I’ve had to repair many of my dresses as the various test stitches have popped with wear. This jersey is so fragile that I don’t think the seams would hold up to the wrong stitch. As I’ve mentioned before I now use something like baseball stitch and it work really really well. Then I use a faux coverstitch for the hems. I own a serger, but I enjoy sewing on my regular machine. I also don’t have a dedicated sewing space, so it is frankly easier to have one machine out all the time than swap them out with every project.

The finished dress is a breeze to wear. Since my birthday is so close to Christmas this dress will do double duty for both events and keeps me nice and warm as well. The only negative thing about it is the fabric is sheer in photos taken with flash. So I’ll be sure to wear some good undergarments!

Lovely Linen

Nothing says the end of summer like finishing a sun dress on Labor Day!

img_7749

But that is exactly how I spent my weekend when I wasn’t focused on potty training our toddler.

I love this dress. After so much frustration with getting something to fit I am thrilled I gave it one more try before moving onto another pattern.

img_7741

This is a mash up on my heavily modified Gertie bodice with the gored skirt from Cashmerette’s Upton Dress. When I made my Liberty dress a few weeks ago I made the mistake of lowering the bust darts way too much. This time I did all the same alterations only I lowered the bust dart 1/2 inch. Such a difference.

img_7751

Still not 100% perfect, but oh so close. Once I tried it on I had to take it in 1/2 inch at the under arm. No big deal and easy to adjust on the pattern piece.

But damn this fits my bust well.

img_7752

And in the back I got the back adjustment just right in the upper back. But then I forgot to re-add the width to the waist. Whoops! Also easily added to the pattern piece for next time. So you can see a bit of pulling there.

img_7745

The fabric is a linen/cotton blend from The Fabric Store. I purchased it right after the Upton pattern came out, but then it sat in timeout while I battled my fit issues. The fabric is quite open in weave so I lined the entire dress with some bright apple green Free Spirit voile I purchased when my local fabric store went out of business. The lining took just 2.5 yards, so I still have another 3 yards of voile for another project.

Thankfully here in Southern California we’ll have warm weather for another 2-3 months so still plenty of time to wear this beauty through fall!